Something like thirty percent of Amazon purchases trace back to the suggestions they make when you buy something. It’s spooky how well they know you.
One thing that Amazon recently tossed up was this style of carving vice, which was new to me. Most of my carvings are panels. When I’ve carved the kinds of things you might want this for, I’ve usually screwed the wood to a two-by-four that that I could hold in the bench vice.
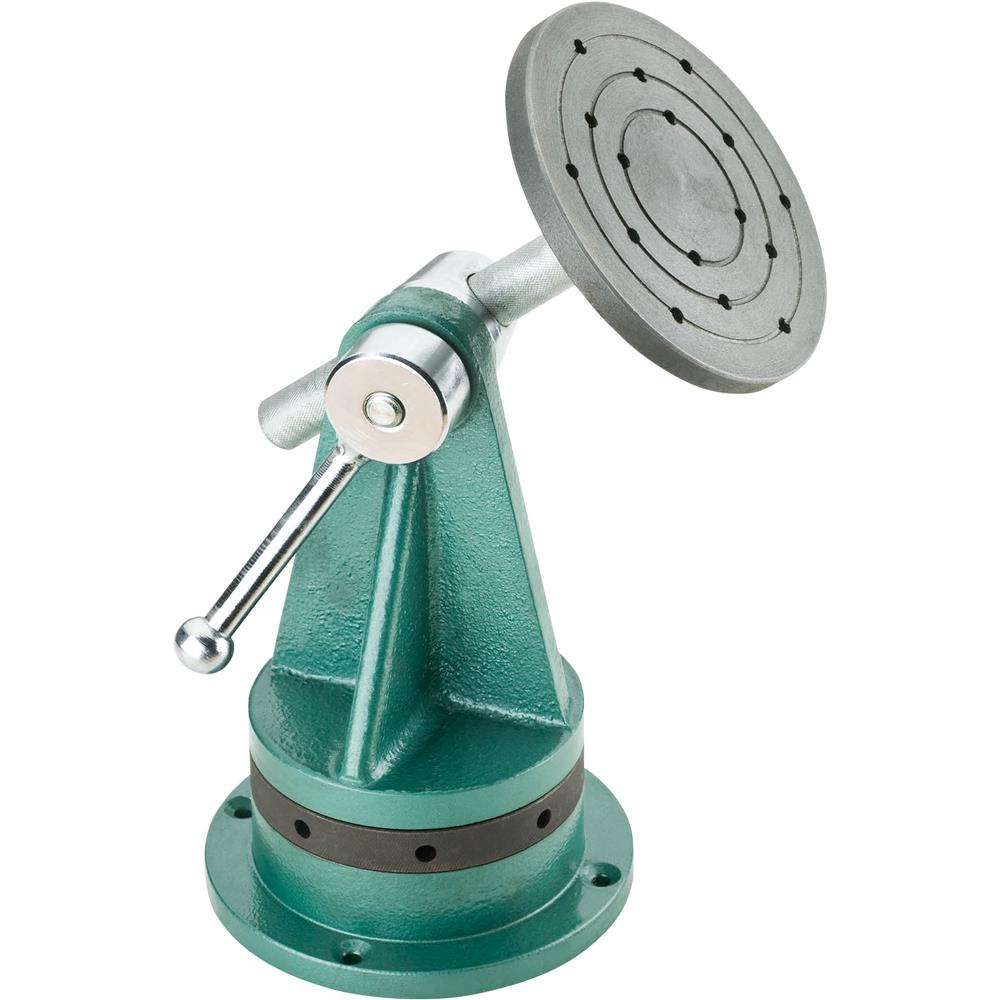
This vice is meant to hold a work piece rigidly at any angle and rotation and allow you to shift its position in seconds.
The identical vice seems to be re-branded by a number of companies so it’s almost certainly the product of a single anonymous factory somewhere in China. I ended up getting the version sold by Grizzly. It was cheap. I think it cost $86.
You usually get what you pay for, so I was prepared to be disappointed.
The Review
Actually, it’s excellent. I’ve rarely been so happy with a purchase. In no way cheesy, absolutely rock solid and a terrific design. It rotates 360 degrees on the base, the shaft that the face plate attaches to also rotates 360 degrees, and the shaft slides in and out and swings about 270 degrees. The range of motion is blocked only when the face plate hits the bench or the vice and you can greatly increase it by mounting the vice creatively.
Construction
I assumed the main body (the green part in the picture) was cast iron but it is actually welded from 1/2″ plate steel. The round face plate is cast iron and the shaft it is on is 11/16 steel. When you tighten it down it is absolutely secure; you’d probably tear the top off your work bench before you could either make it slip or bend the bar.
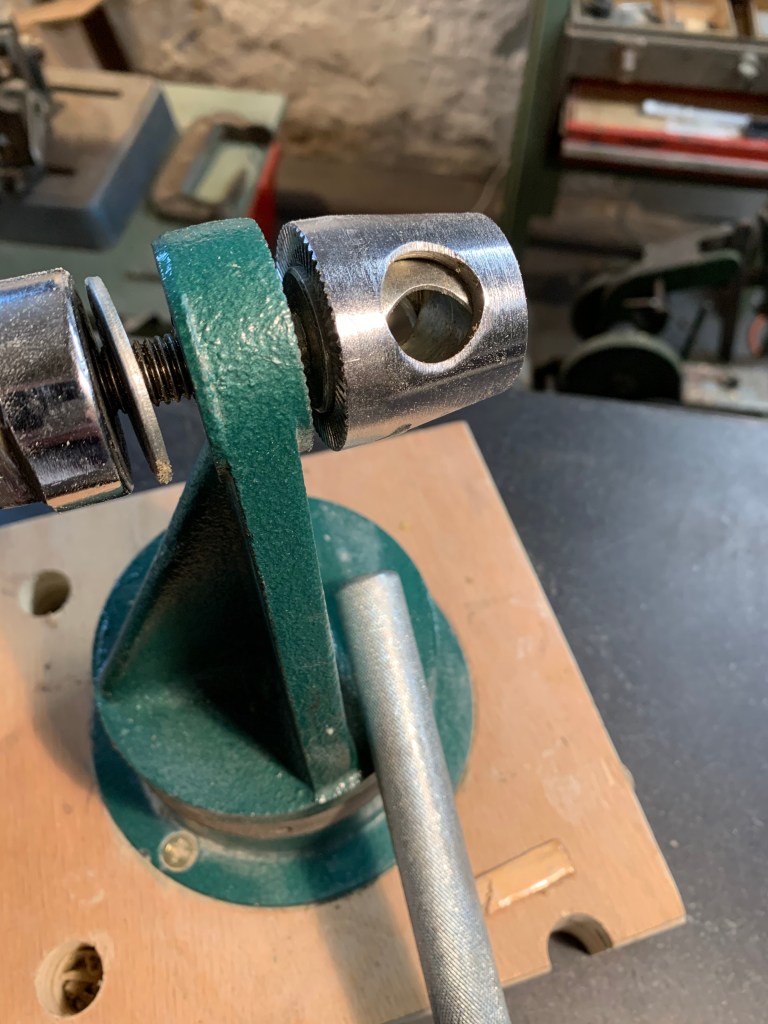
The bar that the face plate is attached to is just a round knurled rod. If you loosen the handle it slides out of the vice. You can see how it works above. The draw bar is visible inside the chromed housing that the bar goes through. The handle (out of the picture on the left) turns the metal cylinder on the left, which I’d call a nut if it were hexagonal. The turning pulls on the screw end of the draw bar (visible next to the green) trapping the shaft against the chrome housing, which in turn pulls the housing tightly against the vertical slab of the base. The base and the housing have ridges that resist slipping at the shoulder. The concentrated pressure of the draw bar locks the shaft, and together they fix everything in whatever posture you have positioned it in. One screw on the draw bar locks down three degrees of freedom. I can’t imagine a simpler mechanism or one less likely to break.
The black band near the base locks and unlocks the rotation of the vice. You loosen it by inserting a handle in one of the holes and turning it. When it is loose the vice can swivel 360 degrees.
Some Things That Could Be Better
It’s not that anything is wrong, but there are a few details that didn’t suit me and a couple of puzzling minor design decisions.
Problem One: The handle to tighten the arm is awkwardly placed because there is nowhere else to put it. It’s not too bad if you just need to snug it up, but if you want to crank it down, it can be hard to get leverage. Worse, if the table is pulled in close to the shoulder, it blocks the handle from making a full turn.
Problem Two: The ring that tightens the base is difficult to turn with the little removable handle. I took the vice apart and greased it and it didn’t help much. The right way to do this is with a type of wrench known as a fixed pin spanner. Unfortunately, this is an industrial tool that is not a common hardware store item. It’s hard to find one for less than fifty bucks, which is a lot to pay for an accessory for an eighty dollar vice!

Problem Three: The face plate is five inches in diameter. It works fine but it was too big for either of the first two projects I wanted to use this for. I suspect this is a common situation.
Solutions
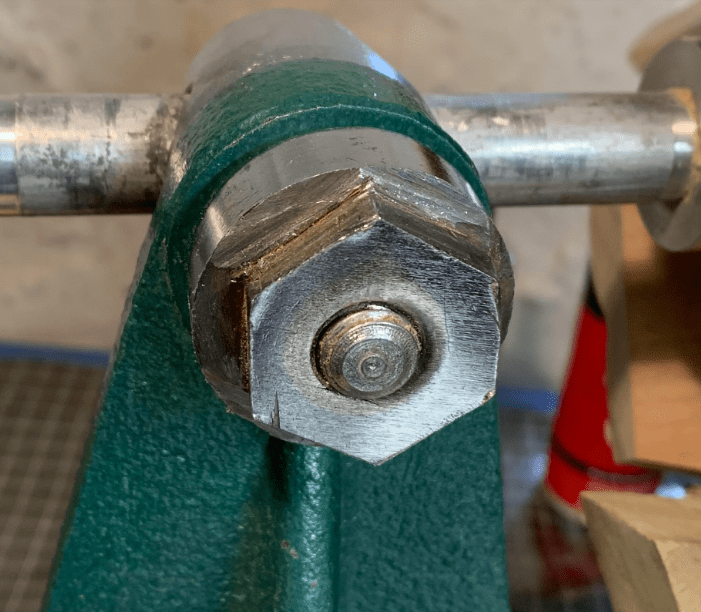
Problem one has a solution so obvious that you have to wonder why the vice doesn’t come that way. I simply sawed the handle off and cut the outer 3/8″ of the cylinder it was formerly welded to into a big hex nut. Tightening and releasing with a wrench is much easier.
There are any number of ways to do this. The absolute best way is with a milling machine. Anyone who knows how to use a mill would know immediately how to set it up to cut a hexagon on the end of a cylinder so we’ll say no more about the mill.
Fortunately, you can easily do the job by hand. (Which is how I did it because the mill was set up for something else.)
If you have a small angle grinder or die grinder you can use it with a fiber metal cutting blade to rough out the hex. Some people might find it easier to do a neat job with a hacksaw instead of a grinder. I used a hacksaw. Either way, be as exacting as possible so that a fixed wrench will fit all three pairs of opposing sides. Otherwise you’ll need an adjustable wrench.
To do it the way I did it you need a vice, a hacksaw with a new blade, a mill file, a cold chisel and a hammer. If you’re not familiar with cold chisels, they are chisels for metal that are used to cut bolts, rod, etc. You can get one at any hardware store. Mill files are the wide flat ones for metal. They usually have teeth on the edges as well, but you can get them without too. Get the one called “mill bastard” or “medium.” Bastard has a precise meaning: it means between coarse and second-cut but people often call any file of that shape a mill bastard file because it’s such fun name to say.
- Optionally, saw the handle off completely and file off any remaining roughness.
- Draw a one-inch hexagon on a piece of card stock and cut it out for a template. You could go a little smaller if you happen to already have a wrench of a slightly different size.
- Lock the cylinder in a vice and trace the template onto the end with a Sharpie.
- The mark the depth of cut for the hex, cut a 3/8 inch strip of card stock and wrap it around the cylinder to guide your Sharpie.
- Use a hammer and the cold chisel incise grooves on the outside of the lines marking the hexagon. The grooves will guide the saw. Optionally you can use the corner of the file to score the grooves a little deeper before you saw.
- Pick a groove and run the hacksaw in it gently until you have enough of a kerf to guide the cut. Then cut all the way down to your marked depth.
- Do the other five sides the same way.
- Saw the six tabs off from the side using the hack saw, leaving a rough hex nut.
- Tidy up the result with the file, being careful to keep everything nice and square and crisp.
I find turning the hex nut with a wrench much easier than wrestling with a handle and it never gets blocked by the table. However, if you’re not confident you’ll like it, there is no harm in leaving the handle attached until you’ve tried it.
Problem two is easy. Tighten the swivel down one last time and forget it is even there. You shouldn’t permanently give up bench territory by fastening the vice directly to it anyway, so instead, attach the vice to a six-inch square of doubled-up plywood or MDF that you can hold in a vice or fasten down with C-clamps or hold-fasts.
You can also use the vice held horizontally. Mark a cross on the square base with the ends of the lines in the center of each side. Drill a 3/8 hole the same distance in from each edge. They should be about half an inch out from there the vice base will be. Be precise so they are exactly radially symmetrically located.
Cut a piece of board–wood, doubled up plywood or MDF to 6″ by 10″. Clamp the base to it as a template, and drill a matching set of holes in the longer piece so you can mount the vice base on it using four bolts with washers and nuts. This will leave a four inch tab that you can grip in the face vice of your workbench to hold the carving vice vertically. You can also clamp it flat so the vice projects out from the workbench.
To get more flexibility with the angular position of the vice when using the face-vice, attach an octagon to the underside using the same bolt holes. Make the octagon a little smaller than the square so it leaves an edge that can sit on the bench top and face-vice chop, with the octagon gripped in the vice at any of 8 angles.
To make the octagon, laminate two five-inch squares of plywood or MDF and cut off the corners off. Clamp it to the square block to drill the holes as you did with the oblong vertical base.
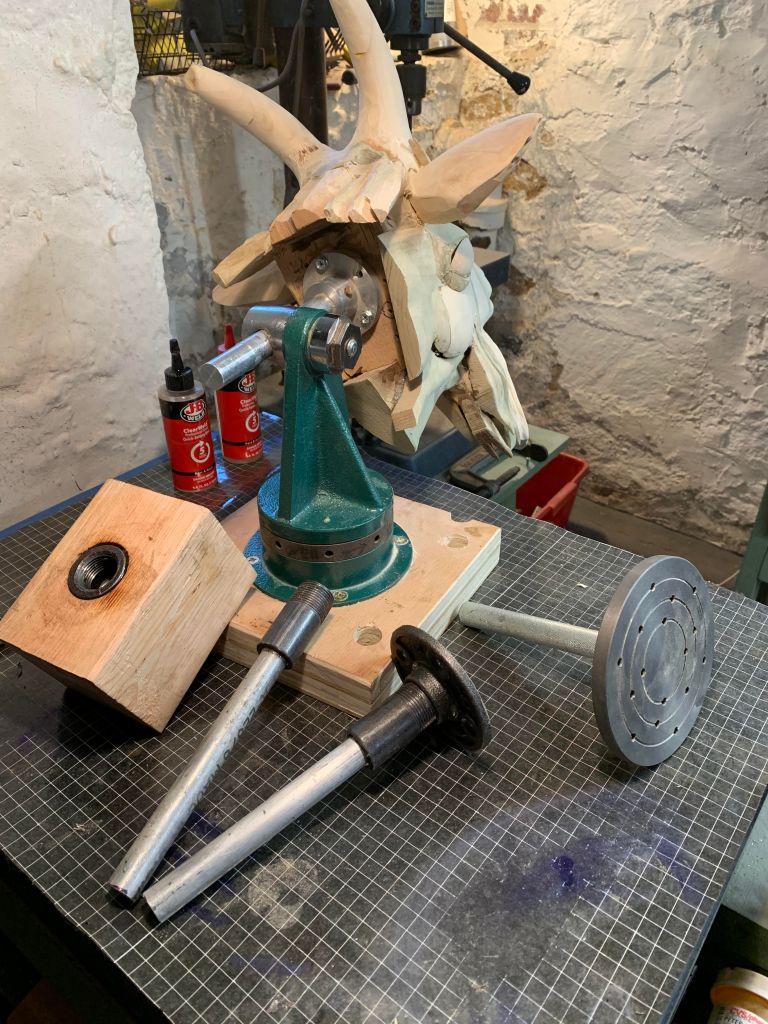
Problem three. The stock face plate is four inches in diameter. I made an aluminum face place 2.5″ in diameter on the lathe. It works fine but it could easily have been less than 2.0″ without changing the basic idea.
You probably don’t have the equipment to do it this way I did it, but I’ll also show a couple of alternate ways that take no special equipment.
I have a small lathe and a mill here in the studio. It’s basically just a hobby that I justify by making little do-dads like this. The machine tools in turn justify the small furnace I built out back to melt aluminum for casting into things to machine using the lathe and mill. The aluminum supply comes from junk that I melt down and pour into muffin tins to make ingots for easy handling. (Don’t leave your aluminum ladder unattended if I’m around.)
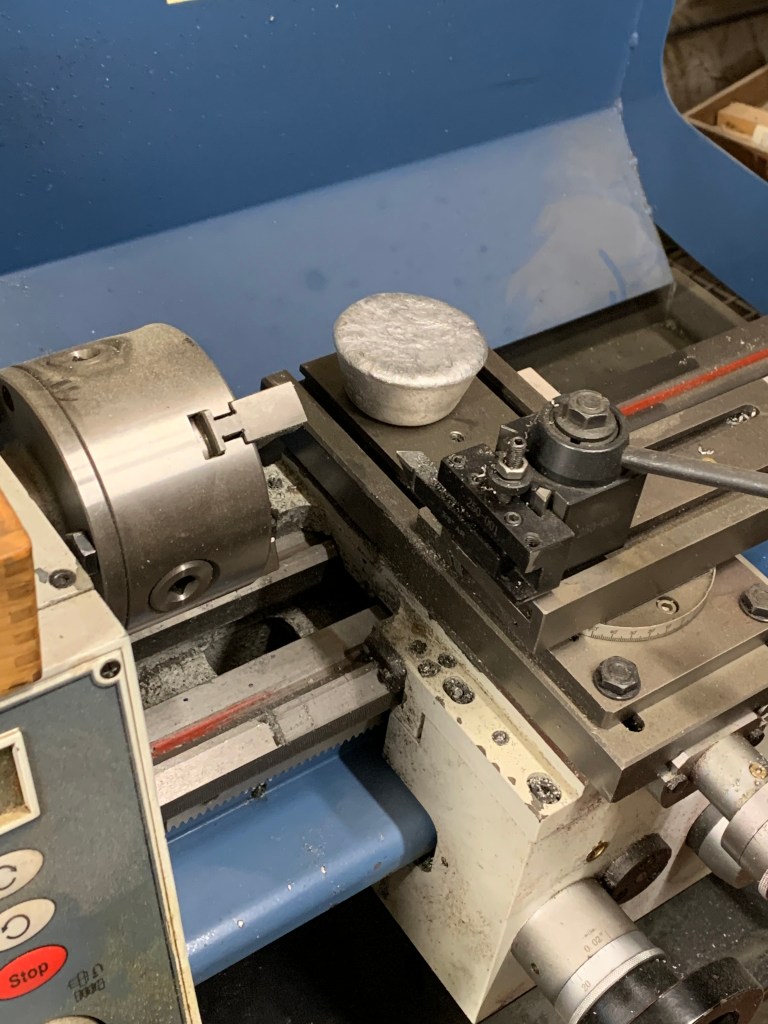
An aluminum muffin sitting on the lathe. 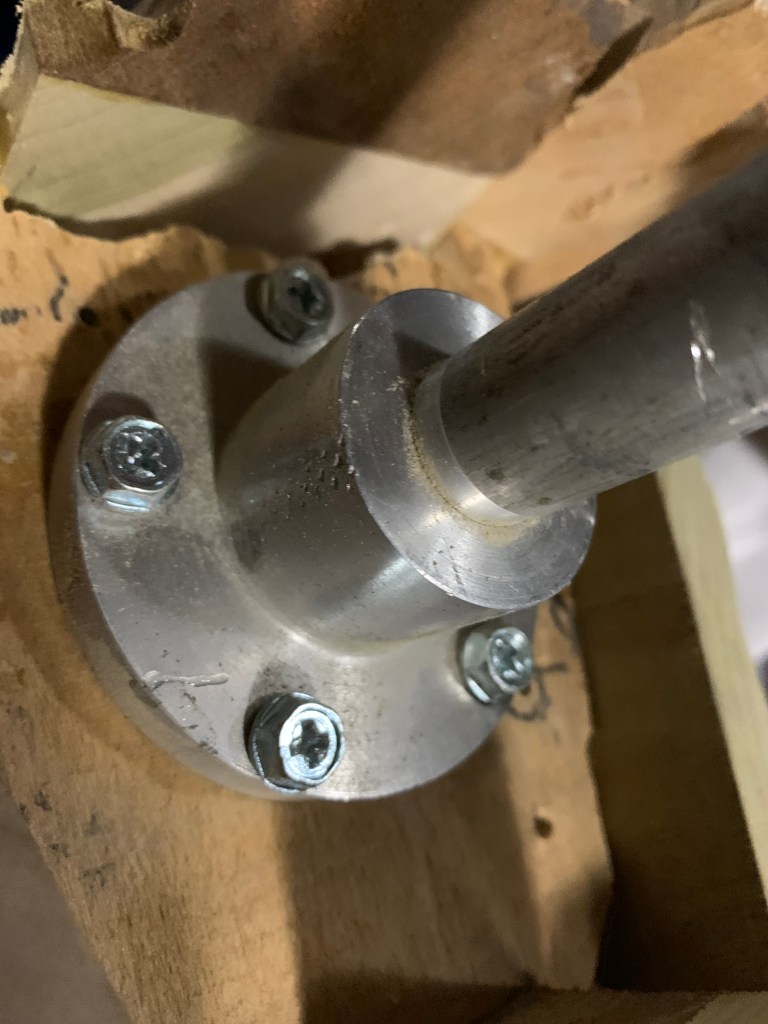
And here it is turned into a face-plate.
A muffin (left) turned out to be just the right size for a mini face plate (right) so there was no need to cast a blank specially. I had a piece of 3/4″ aluminum round bar in the studio already so the whole thing cost zero dollars in materials. The hole in the mini-face plate is bored 1/1000th undersized and the shaft pressed into it with a few tons of force, so it would probably be almost impossible to get it loose, but just to be sure I also drilled a 1/8″ hole and put a pin through it for good measure.
Problem Three: A Less Exciting But Easier Way
Here are two variants on a lower tech way to do solve the problem. A picture of the results are below.
To make a smaller face plate you need a plumbing part called a “floor flange” for use with 3/4″ black iron pipe. You also need a short piece of that size pipe with threads on at least one end. See the picture below. Any big box or plumbing supply shop has both.

If you already have a piece 3/4 inch pipe around, great. You only need threads on one end. Cut off 2.5″ or so including the threads. If you don’t have any pipe, ask at the store for a three-inch nipple and saw the threaded part off one end. I had an 8″ nipple already so I cut a 2.5″ piece from each end.
Eleven-sixteenths inch bar stock isn’t a standard size you can get at the hardware store so I used 5/8″ aluminum. 5/8″ steel would work fine too. Use a hacksaw to cut a piece the length you want. It wouldn’t hurt to go an inch or two longer than the shaft that comes with the vice. The bar stock will rattle around in the pipe. That’s OK because you will use epoxy to hold the bar stock in the pipe. Epoxy is tenacious and strong and it’s not really sticking the metal together; it is mostly just filling the space. It will be extremely strong when used in this way.
I used five-minute epoxy, which can get messy. Below is how I did it, but a paste like PC-7 or even plumber’s epoxy would be simpler and less messy. Whatever you use, be sure to clean and de-grease the metal.
- Screw the 2.5″ pipe into the flange.
- Using a piece of Plastilena or softened wax to plug the bottom from below so that the epoxy won’t run out the bottom. I used microcrystaline wax that I normally use for modelling.
- Scuff up two inches of one end of the rod to give the epoxy something to grip. My rod was aluminum, so I put it on the anvil and tapped it with a hatchet repeatedly to make many nicks. If you’re using steel you could rough it up with a bench grinder or hand grinder.
- Mix the epoxy (it’s usually equal parts, but follow the directions) and slather the results over the end of the rod and inside the tube. About half an inch puddle at the bottom should be enough to completely fill the gap when you insert the rod.
- Have a rag handy to wipe up the overflow. If it doesn’t quite fill, withdraw the rod and add some more until it completely fills the gap when you insert the rod.
- “Five minute” means it will kick in five minutes, i.e., no longer flow. It fully cures overnight.
- Gloves are a good idea with epoxy, but you can clean your hands and tools with denatured alcohol while it’s still wet.
Another Variation
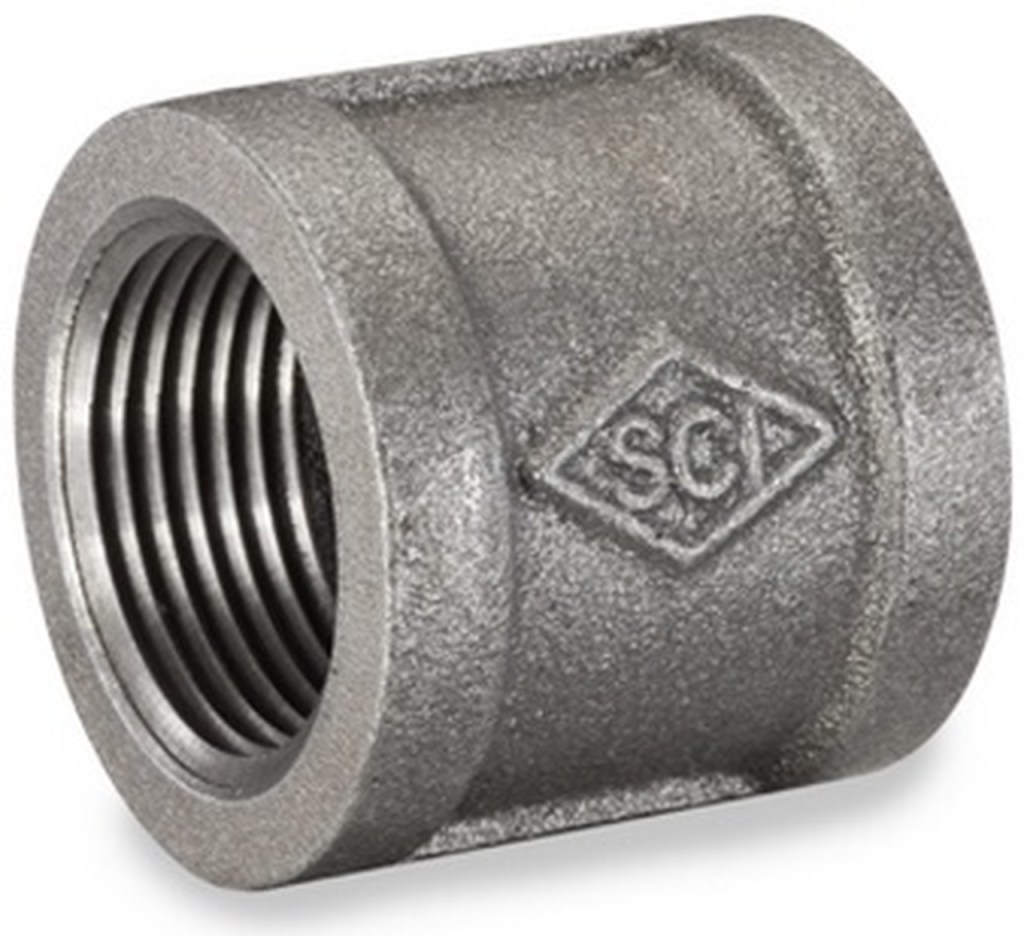
I also wanted to be able to hold pieces that present a very small surface for attachment. To do this used a plumbing fitting called a coupling, which is just an iron sleeve threaded at both ends to connect two pipes.
A note on plumbing parts: couplings and other fittings are available for all pipe sizes and almost all pipe and parts come in black iron, galvanized iron and brass. Note that plumbing threads are different from normal machine threads because they taper. A threaded pipe will only go into a threaded fitting to the designed depth. The fittings are all pre-threaded but the pipe can be purchased in short pre-threaded lengths called “nipples” or in long pieces that may or may not have threaded ends. It’s easy to thread pipe if you have the right tool so it’s a very versatile material for all kinds of things in the studio.
The coupling attaches where the face plate would otherwise go, but instead of being screwed to the work piece it is permanently embedded in it with epoxy. (A coupling only costs about a dollar.) If you are thoughtful about placement it can serve as a mounting point for the finished work.
The coupling is 1.5″ in diameter and 1.5″ long, so I bored a hole slightly bigger than 1.5 inches 1.65″ into wood. The hole is oversize to give a gap for the epoxy to fill, and 1/8″ deeper to leave a space for a flat disk of wax at the bottom. The wax is there to act as a seal so that the epoxy doesn’t flow under the metal and fill up the coupling.
I warmed the wax slightly and pressed the coupling in to pre-form it, then took the coupling out and wiped epoxy liberally around the inside of the hole. It doesn’t matter if some epoxy pools at the bottom–the pipe goes less than half way into the coupling.
The coupling has ridges about 1/16 high on the ends and sizes so there is significant space between wood and metal in much of the hole. I coated the coupling liberally and put it in the hole and gave it whack so it would seal tightly against the wax.
The coupling and the wood are both dripping with epoxy when you assemble it, but the gaps won’t be full. The loose fit is so you can flow epoxy into the gap until it fills up. When it will take no more wipe off the excess and let it dry It’s possible that the wood will soak some up, so until the epoxy kicks, be prepared to top it off.
The shaft for the floor flange also works for the embedded coupling. I made an extra but you can get by with just one for both purposes.
