This is my penultimate post on studio furniture. Hopefully there’ll be one last installment on working platform attachments that can be used with this or with the Roman bench.
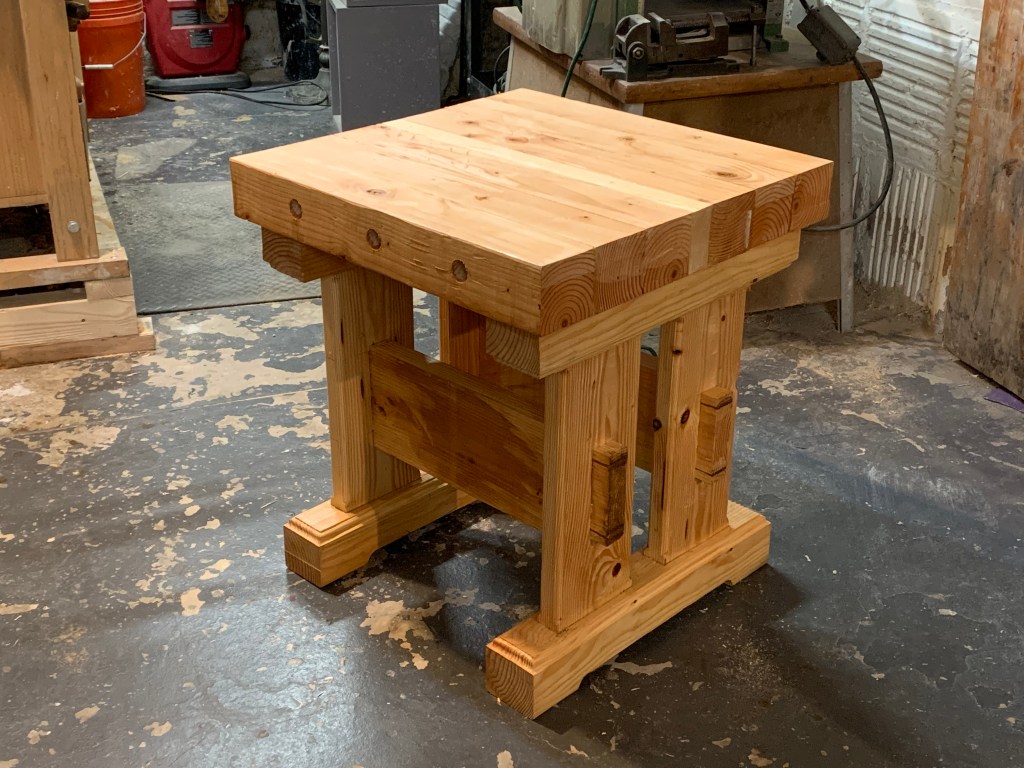
This platform is for heavy work. A big block of stone, a 400 pound anvil, or a section of tree trunk. Heavy stuff. I don’t know how much it would safely hold, but it’s a lot. I would not think twice about setting a half-ton block on it. I just did exactly that, in fact.
Except for the lag-bolts that fasten the removable top on and the little hardwood wedges in the ends of the through-mortises, it’s all Douglas fir from the big-box store. (Since writing this I replaced the lags with carriage bolts counter-bored though the top.
Except for the top, most of it isn’t planed or sanded, but simply shellacked as is. The top is planed smooth and true (no warp or twist,) deeply enough to remove the round factory corners. Removing the factory corners is purely aesthetic. I have an electric plane so it was just as easy to do this after assembly as to do it on the table saw. It would be significantly more work with a hand plane.
- The overall height is 26″, which is four inches lower than a dining table.
- Without the removable top, it is a 22.5 inch cube, exactly the same height as the sawhorses and the bench (22.5 inches.) See the other post.
- The top adds a little less than 3.25 inches for a total height of 25.75 inches with the top on. Buttons on the bottom of the feet will make up the quarter inch.
- The bridges between the trestles are the same elevation from the floor as the saw-horse and Roman bench bridges (13.5 inches) to facilitate using the horses, bench, and this monster together for scaffolding or working on large panels.
Design Notes
There’s not much need for plans because you’ll want to size it to your needs anyway. Once you know the size you want, the rest is pretty obvious from the photo. Power tools are nice, but other than the decorative routing on the legs and feet, there’s nothing here you can’t easily do with simple hand tools: hand saw, brace and bits, a plane, a chisel and mallet, a tape measure, and a try-square. If you replace the beading with champfers you don’t need the router either. You don’t even need bar clamps to glue up the top. If you plane the faces flat, the threaded rod will hold the pieces tightly enough while the glue dries.
There are a few things to keep in mind.
The Wood
Fir is cheap, strong for a softwood, and has a relatively high strength to weight ratio. It’s reasonably attractive when varnished, but it’s tough to do neat joinery with fir because it’s shot through with hard coarse fibers mixed in with soft wood. Mortise and tenon joints can be raggedy looking if you’re not super careful and you can’t get a smooth furniture-style finish that will last because of the alternating soft grain. But it’s great for studio furnishings.
Why It’s a Strong Design
The strength of a bench like this doesn’t come primarily from the resistance of the vertical components to crushing weight. When a table-like structure fails from having too much weight put on it, the legs are rarely broken by vertical force. The failure mode is usually that the structure twists or racks and then legs fail where they attach to the top or to some other horizontal member. If legs do break they almost always bow first and then snap–they don’t just telescope down.
Therefore, the most important aspect of a strong design isn’t usually bearing strength of the wood legs so much as it is the minor members that keep the legs straight and perpendicular. Even a light member that prevents a leg from bowing increases overall strength enormously. For instance, that’s what the X’s of wood you see between floor joists are for. They’re just light-weight 1×2’s but they stop the joists from twisting under load, which makes the floor much stiffer.
In keeping with this theme, the top is extremely stiff, being glued up from six and a half 4×4’s bolted together with 3/8″ threaded rod, and fastened to rails that are also 4×4’s. The stiffness means that there is very little flex, which means the load will always be transmitted almost perfectly straight down. To see why this is important, picture a table with a sheet of plywood for a top. A heavy load would bend the plywood down in a U shape, pulling the tops of the legs inward, causing the weight to no longer be pointed straight down through the legs.
The legs are nominally 2×8’s, which means their actual size is 1.5″x7.5″. They are relatively short and mortised one inch deep into both the footers and the rails, which are all sections of 4×4’s. They are glued in place. Using two legs on each side rather than one wide leg reduces problems with wood expanding and contracting from humidity changes (and it looks cool.) The total width across the legs creates a structure that is very resistant to either racking from side to side or twisting.
The mortises in the feet and rails also strengthen the bench because the legs are tightly boxed in on both ends, preventing them from splitting.
Racking or twisting in the other direction is prevented by the dual 7.5″ high bridges that are through-mortised into the legs and glued and wedged into place. In order to cause the bench to rack you’d have to apply enough sideways pressure to snap or extract the tenons which are very substantial: 5″ by 1.5″.
In addition to preventing racking, the wide bridges also stiffen the legs because only the short sections above and below the joints can flex. This keeps the legs parallel and straight in both the flat direction and the wide direction, which greatly increases their ability to support a load.
Construction Notes
The Wood
Look for clear fir without checks. Small tight knots are ok, but only where they won’t be near mortises or tenons. Best to keep them away from edges, too, as they interfere with the routed beading on the legs and feet. (Not just at the corner where the router cuts but in the middle where the guide bearing runs.)
Let the wood acclimate in your studio for a few weeks. It will lose perhaps 20% of it’s weight in water in just a couple of weeks, especially if you have a fan on it. If you cut tight fitting mortises when the wood is not fully dry, they will be too small when the wood shrinks, leading to splitting. Lay the lumber down straight with strips of wood between the boards to allow air to circulate. If you just throw it in a pile it will immediately twist and warp.
The Stopped Mortises
To make the stopped mortises in the footers and rails, drill out the bulk of the waste with a Forstner drill. You can also use spade bits, but Forstner bits do a neater job. A drill press is ideal because you can set it to stop at a consistent depth (mine are 1″ deep.) With a Forsner bit, the holes can overlap by as much as a third of the diameter of the hole, allowing you to get most of the waste with the drill. If you use a spade bit the holes shouldn’t overlap. Either way, clean up with a sharp chisel.
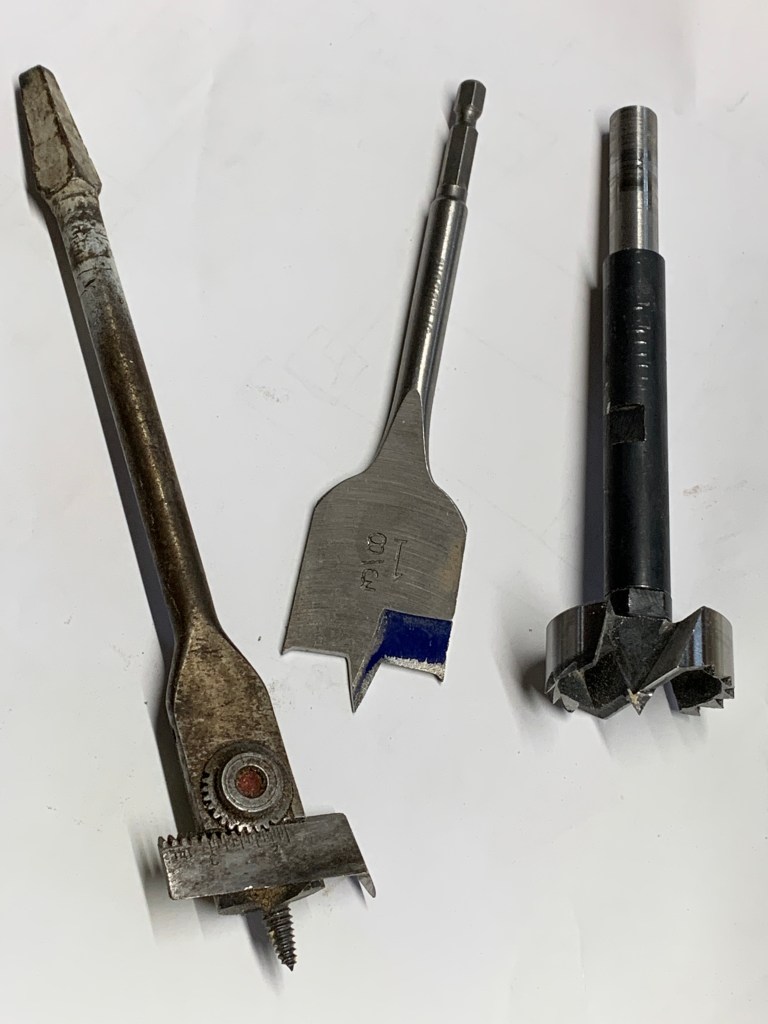
Drilling Big Holes
The picture above shows three of the many ways to make big round holes. On the left is an adjustable augur that you’d use with a brace (not with a power drill.) They come with two cutter sizes so you can bore holes from about 3/4″ up to 3″. (1.5″ augurs exist but they’e hard to find.) It takes skill and muscle to bore large holes by human power but one bit is good for all sizes. Another down side is that young people might make fun of you for using one. Call you a dinosaur, ask if they can borrow your stone ax, etc.
The drill in the middle is a spade bit. Spade bits are cheap. They work best with a power drill or drill press, but in a pinch you can use one in a brace. The one pictured has a hex shank, but they more often have round shanks. Hex is better if your drill chuck doesn’t use a key because the kind without keys don’t grip very tightly. Spade bits work well and don’t require much skill or strength but they’re a bit rough, more of a carpenter’s tool than a woodworker’s tool.
On the right is a Forstner bit, the Cadillac of big drill bits for wood. One of their best features is that they can drill a partial hole, e.g. one that overlaps another hole or the edge of the wood. This kind of bit work best with a drill press. It’s possible to use one with a power drill but I do not recommend it because it’s difficult and dangerous. When used in a manual drill they can easily snag and unless the drill is turning very slowly and there is enough torque in even a battery powered drill to tear the drill out of your hands and throw it or to injure your wrist.
Beading The Edges
Do any beading before assembly. Use a router and a beading bit with a bearing that follows the edge. You’ll need to clamp wood stops 1.5 inches or so from each end so the routed edge doesn’t run into the hole leaving an unsightly gap. Stopping the beading about three quarters of an inch from the top of the foot gives a subtle Art Deco like grace.
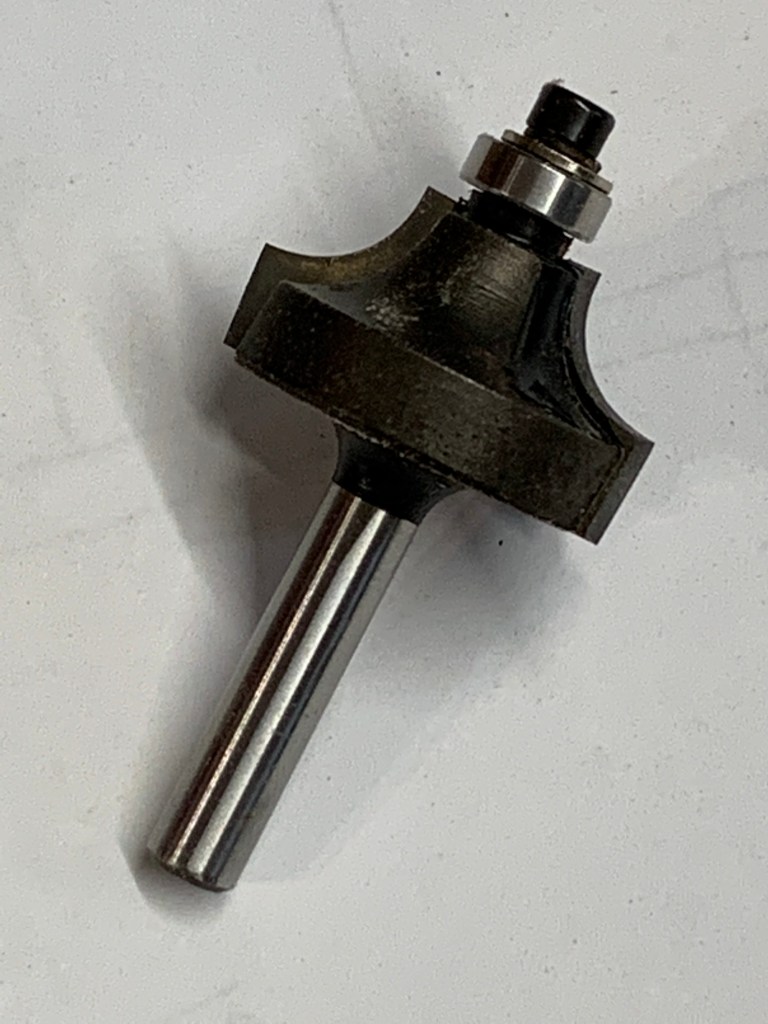
This kind of router bit allows a choice of bearing sizes. Make sure you have the smaller bearing installed because gives a symmetrical bead if you set the depth correctly. If you use a full size bearing you don’t get the step. It will be obvious when you set it up. Be sure to test on a clamped down sample. Routers are more dangerous than they look like–don’t be careless and if you haven’t used one before, get someone to show you or watch some YouTubes first.
Through-Mortises and Tenons
The tenons on the bridge will go all the way through the legs and stick out an inch. The inch is functional as well as decorative in that it lines up with the edge of the top. This makes it easy to clamp panels and boards vertically on the tenon side.
For the through-mortises you will want to do the chisel work from both sides for a clean square hole. Mark the rectangular outline of the mortise precisely on one side, then strike the lines for the top and bottom around to the other side using your square. Also mark the vertical sides of the mortise on the other side, working always from the same reference edge of the board.
Drill out the waste just as with the stopped mortises but go all the way through (if you are using a drill press.) If you aren’t using a drill press, drill half way from both sides to minimize the effect drilling at a slight angle. Once the hole has been squared up with a chisel, cut the narrow sides that will be the top and bottom so they are tapered slightly, widening towards the side that will face out. It doesn’t have to be much–no more than 1/8″. This will let the wedges expand the tenon on the outside but not on the inside. Don’t forget to mark which side is the outside! (Tip: use chalk for this kind of thing.) Saw the wedges so that they fill the slot over its full length without leaving a big gap inside near the shoulder. The wedges should be the width of the kerf at the pointy end and a little more than wide enough to fully expand the tenon at 1.5″. Overall they should be about three inches long to allow for the full length of the tenon plus a little to trim. (Remember, the tenons stick out an inch.)
The tenons should have a shoulder on top and bottom. The bridges on mine are 7.5″ high, so I left a one inch shoulder on each side leaving a 5.5″ tenon. You could get away with less, say, half inch shoulders. Saw a slot on each side of the tenons about 5/8 inches from the edge so you can use the wedges to expand them into the widened outer opening after it’s assembled and clamped.
Glue and clamp the two trestles first. When the glue has set, put it together with the rails and finally, drive the wedges. Dab a little glue into the sawn slot so the wedges can’t work loose.
The Top
The top is sized to use the full width of six pieces of 4×4 plus one piece of 2×4. You don’t have to use full width pieces but the symmetry looks nice. Salvaged wood of any width would be fine too but the width matters to the design. Keep the same overall dimensions I’ve used OR if you plan to build the bench or sawhorses, match the corresponding vertical dimensions. Without the top, it’s a cube, so changing the top size also changes a lot of other dimensions that work out automatically if you’re using dimensional lumber.
Mark the locations for the holes for the threaded rod in all seven boards for the top. Drill them precisely, preferably on the drill press. On the two outer pieces, first drill 1″ counter bored holes an inch deep before drilling the 3/8 inch holes (or you won’t be able to center them later unless you have a 1″ Forstner.) If you don’t have a drill press, strike the lines around and drill half way from each side to minimize wandering. Then square up all the boards on the bench and clamp together and drill the with an extra long bit. They don’t come long enough to go the full width so you’ll probably have to go in from both sides.
I used 3/8 inch holes for 3/8 inch rods. This might have been a mistake. It was quite difficult to get the rods through. If I were doing it again I’d use 7/16 inch holes especially if you’re going to use the rods in lieu of clamps.
Fasteners
I didn’t use any mechanical fasteners except for four removable lag bolts to hold the top on and I ended up replacing these with carriage bolts set below the top in counter bored holes. I’d like it to be easy to remove the top so that the base can be used with the saw horses to support work platforms.
It wouldn’t do any harm to add slender lag bolts up through the feet into the legs and down through the rails into the legs. You can also use jumbo construction screws for the same purpose. They should be counter-bored below both surfaces and they will require washers so the heads don’t sink into the wood. Dry assemble the trestles flat on a table and drill the holes before gluing.
The holes through the rails and footers should be big enough to allow the lags to slide without the threads biting, while the holes in the top should be small enough that the threads bite. This lets the lag pull the two pieces together rather than letting the threads lock the two pieces of wood into a fixed relative position as you tighten. The holes in the legs should be slightly smaller than the diameter of the screw between the threads so that the threads will get plenty of wood to bite on but the screws won’t split the wood. Drill the full length smaller holes through both pieces then widen the 2.5″ sections that go through the footers and rails. If you do this you won’t even need to clamp the footers and rails to the legs when you do the final assembly. Alternatively you can do the final assembly with clamps and put the screws in later, which has the advantage of being less likely to split the legs.
Leveling the Top
Level up the top with your plane using a pair of winding sticks. A scrub plane is handy if you have one but any two-handed plane will do. Winding sticks are just straight parallel battens, say, 3/4″ by 2″ plywood. You put them on opposite edges and if you site across the top you can easily see whether the stick are parallel. If they aren’t, then the surface isn’t flat. Plane as required to make the sticks line up, checking that you’re also keeping the top locally flat under the sticks. The way the top is made you should not have much winding but you will probably have some wood a little high or low. Flat is enough–there is no need to make it super smooth. When you’re happy with the flatness, shellac or varnish the entire thing. The coating makes it look good and it reduces swelling and shrinking in response to humidity changes.
Optional Stuff
The top is thick enough to allow hold-fasts to be used. Size them for your hold-fasts. Mine take a 3/4″ hole but the correct size is specific to a particular hold-fast.
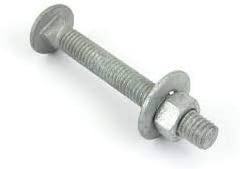
The top is held on with carriage bolts counter bored through the top and all the way through the rails. Carriage bolts have a big round head that acts like a washer to prevent it sinking into the wood, and the shaft just under the head is square, not round. (See the picture.) The square section bites into the wood so you can tighten the nut without needing hold the head with a wrench. Lag bolts would work fine too but carriage bolts will make it easy to take the top on and off. (I started with lags and eventually changed to carriage bolts.)
My floors are not very flat, so nothing with four legs ever seems to sit flat. I’d like to install some adjustable bolts that can be compensate. I’ll make this a separate post.
Final Judgement
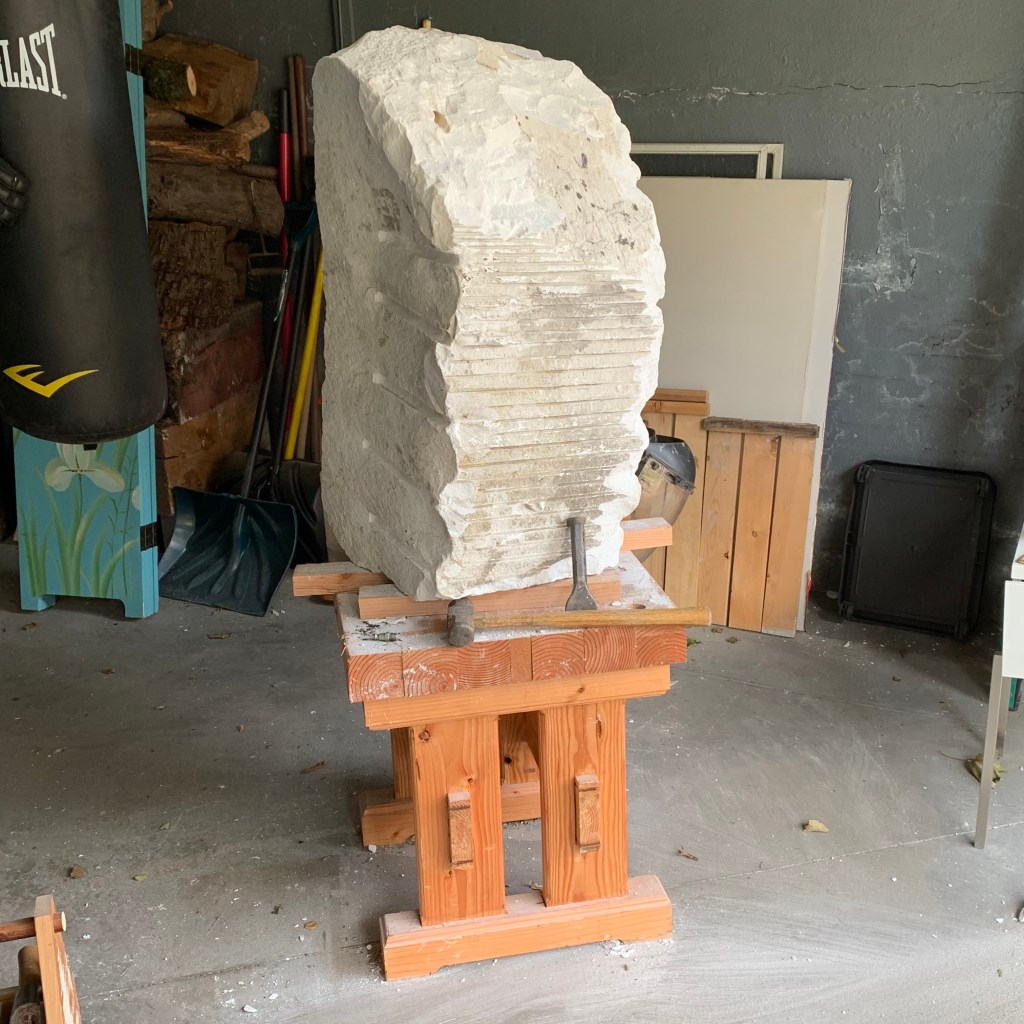
I’ve used it and it’s great. I have a 1000 pound block of stone sitting on it and it feels as solid as a tree-stump. It’s a little heavy, but for me, that’s a feature. A lot of weight close to the ground is good when you’re working with heavy materials.
I had a studio accident involving this platform. I misjudged the situation lifting this same block from a horizontal position and the shifting weight tipped the table up on two legs and shot it out from under the engine hoist. (Which I why I stay way back.) Anyway, even with enough off-balance weight to push it up on two legs and shoot it out like a pumpkin seed, it was completely unharmed. Nothing cracked or even loosened up–just a few scuff marks.
